Step by step guide to deploy your Meteor.js app
-
1Installing the NodeChef CLI
Make sure Node.js is installed on your computer which should be the case if you are deploying Meteor.js or Node.js.
Install the CLI by running the below command:
npm install -g nodechef-cli -
2Deploy your cluster
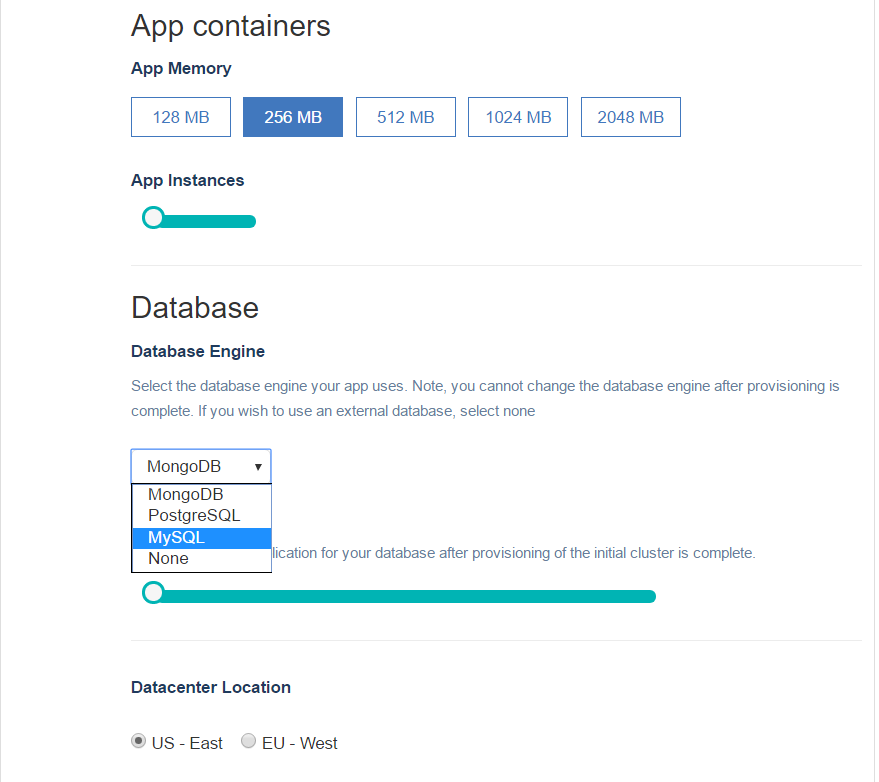
Log in and navigate to the Dashboard. Click on deployments and complete the form. You will be required to select the size of your container and the region where your cluster is to be hosted.
Once the cluster is provisioned, a URL will be assigned to your project which will be displaced on the dashboard.
- 3[OPTIONAL] Create the ncmanifest.json in your project folder
The ncmanifest.json is totally optional and you can specify almost all the parameters from the command line. In the root folder of your app, create a file with name ncmanifest.json and use the below example JSON:
{ // [REQUIRED] Enter the name of your app. This is the name you provided in step 2. "name": "simple-todos", // [OPTIONAL] Configure environment variables if any. The below environment variables // are only for demonstration purposes "env": { "ROOT_URL": "", "PAYMENTS_API_KEY": "" "METEOR_SETTINGS": { } }, // [OPTIONAL] - You may customize the meteor build by setting one or more applicable options "meteorbuild": { "allowIncompatibleUpdate": true|false, "server": "Set it to your ROOT_URL", "serverOnly": true|false, "debug": true|false, "mobileSettings": { public: { } } } } -
4Log in from the CLI first to deploy// Type nodechef login and you will prompted for your credentails. nodechef login // You can also generate a deployment token from the dashboard and skip having to login: nodechef deploy -i myapp -auth paste_deployment_token_here
REMAKRS
Once you log in, you will remain logged in on your computer forever until you log out.
You can create a deployment token from the dashboard. Click on App actions → Deployment token. Click the generate token button.
** IMPORTANT ** - For accounts that signed up with a third party log in provider such as GitHub, Bitbucket etc. you will have to use a deployment token to deploy or create a password from the dashboard..
- 5Launching your app
From the command prompt or terminal log in and then deploy your app.
// After logging in, you can then deploy with the below command nodechef deployARGUMENTS
-iRequired. Specify the name of your app. Use this option if you are deploying but haven't created the ncmanifest.json file.-lRequired. You could build your Meteor.js project into a tar.gz file using the [meteor build] command. You can then use the -l option to provide the absolute or relative path to the .tar.gz file.-meteorsettingsOptional. To deploy your app with meteor specific settings. You may set your Meteor settings in the ncmanifest.json or you can provide the absolute or relative path to the settings.json file.--startupwaitOptional. Whenever you deploy your app, a new container is created which replaces the old one. The intent is to allow a seamless upgrade without any of your clients ever hitting an empty page. However for this to be possible, the new container has to completely load and ready to accept incomming connections. This parameter allows you to control how long in seconds the container manager will wait before replacing your old container with the new one. The highest value that can be specified is 60. Note the usage of a double hyphen before startupwait. eg: deploy -i simple-todos --startupwait 10